

Bear in Lamb Sleep Suit: Diagrams and Assembly
March 26th, 2008 | View Comments
Debbie recently asked me for help in assembling the Bear in Lamb Sleep Suit. While there are some tips for assembly in my original post, here I’ve added schematics for the trickiest bits to assemble: the head and the legs.
Back of Head
In the diagram below, the light blue arrows indicate the direction of knitting.
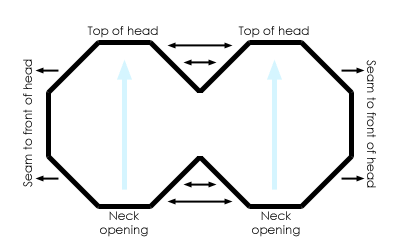
Note that the back of the head is constructed in much the same way as the arms and the body. You make conjoined octagons and then sew the seams indicated by the black double-pointed arrows. After you are done with this bit, you will have a small bowl-shaped piece.
Front of Head
The front of the head is a little trickier. First, line up the pieces as pictured, with the right sides facing you—if you’ve done this correctly, the two bound-off stitches at the side of each piece should meet in the middle. The blue dots represent the row markers you placed while knitting.
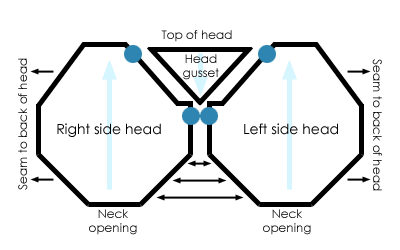
The first thing you should do is sew the right side and the left side together where indicated by the double-pointed arrows—this is the side of each piece from the cast-on edge to the first marker. This seam runs from the center chin to the nose. Do not sew the cast-on edges together! This will be the neck opening you use to stuff the head.
Next, sew the head gusset in. Line up the tip of the triangle with the center of the V where the bound-off stitches meet. Then seam each side of the triangle to each side of the head, lining up the head gusset’s cast-on edge with the second marker. Note that the cast-on edge for the gusset is the top of the bear’s head.
You should now have another bowl-shaped piece (this one has a little point at the center) for the front of the head. Sew the back and front of the head together at the sides and at the top, leaving the neck open for stuffing.
Instructions for leg assembly after the jump.
Leg
If you follow the directions in the pattern, your leg pieces should look something like this when laid flat with the right side facing you:
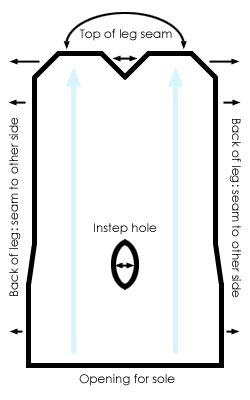
The little hole in the middle is the instep opening—when sewn shut, it will become the top of the bear’s foot. Sew the back leg seam, starting from the bottom and going partway up the leg. Now you have a half-open tube shape. Sew the small round sole piece into the sole opening. Stuff the leg, and sew the rest of it closed.
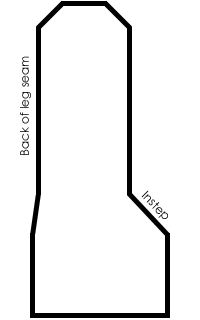
This is what the side view of an assembled leg looks like:
Assembly
There are no instructions in the pattern for which end of the body is up or down. In my case, I decided that the cast-on edge was the neck end, and the big opening at the bind-off edge was the butt end. I don’t think it really matters either way.
Stuff all the pieces separately and sew them closed. Attach the head, arms, and legs to the body. You can follow the directions in the pattern, but I usually attach toy parts using the same mattress stitch method as Mochimochi.
CogKnition posted this on March 26th, 2008 @ 11:05pm in Tutorials | Permalink to "Bear in Lamb Sleep Suit: Diagrams and Assembly"


I can’t THANK YOU enough for your diagrams!!! I was so excited to knit a teddy bear and wanted to jump off a bridge when trying. I consider myself an experienced knitter and I could not figure these patterns out. I was working at my own diagrams but wasn’t quite sure I even knit her pattern correctly. You have saved me in so many ways.
You’re welcome, Pam! I’m glad I could help out.
Out of interest, did you sew the legs on in line with the body or perpendicular to it so that the bear was in a sat up position, I can’t decide what looks better, I think the picture in my books looks like the bear is sat, but I just wondered what you had done having made the bear.
Thanks
I sewed the legs on in line with the body, but the attachment points are so small that the bear will naturally “sit down” on his butt when you put it down–the bear won’t stand up on its own.
The pictures on this post might be helpful.